
Hi! Seasoned crocheters and crocheter newbies welcome :)
Idk about you, but I've been looking for more cute crochet projects to work on for the upcoming holidays that are 1) fun and quick to make 2) new and unique, and 3) don't require anything other than yarn and a hook (for this I'm looking at you, pom poms lol - and yes, I do know you make pom poms with yarn but I want an easier way to make little ones, okay? 😂).
I had this idea to make seasonal garlands (like the skull ones I made for Halloween). So when one of my friends suggested making a Santa hat garland for Christmas, I was like immediately yes 👏🏻 but wasn't sure what the best way to go about making one would be. Most crochet garlands are made flat or 2D but I wanted to find a way to make some small 3D ones and then attach them together with white yarn that also makes the pom pom of each hat. Idk if that makes any sense but I'll explain more :)
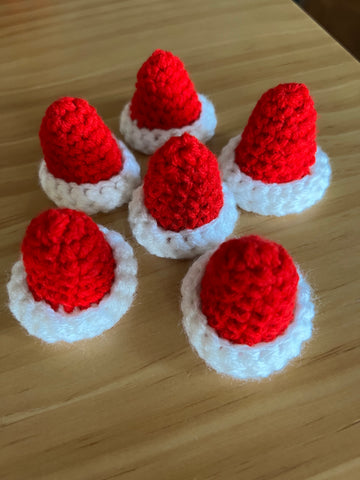
I experimented a bit trying to make some Santa hats on my own (they didn't turn out as 3D as I had hoped 😢), and ultimately landed on this one instead:
📌 the Small Christmas Hat pattern by Woolly Island, which you can find here :)
It's a super easy and straightforward pattern, worked from the top down and the final rows are worked in white to make the brim.
So here's what I did :)
Gather materials:
- 3 mm crochet hook
- acrylic yarn in colors red & white
- scissors
Make the hats:
I crocheted 6 red and white hats using the pattern I mentioned above (minus the pom pom)
Create the garland and pom poms (I used white yarn):
- chain 10, slip stitch into first stitch (creates hanging loop), chain 40
- *take one of the hats and work a puff stitch into the space between the 1st and 2nd rows, then chain 30*
- repeat the process between ** for the remaining hats (there will be 30 stitches between each hat and 40 stitches between the last hat and the hanging loop)
- now chain 10, mark the current stitch, chain 10 more and slip stitch into the marked stitch (makes second hanging loop)
- cut the yarn and weave in all your ends
And that's it! You can adjust this to include as many or as few hats as you want and the space between each Santa hat can be adjusted however you see fit.
Just a little insight into how my crochet brain works, hope you enjoyed it haha.
I'm planning to make a few of these to include in my upcoming Christmas drop so keep an eye out if you'd prefer to purchase one :)